Belt Sander: Difference between revisions
No edit summary |
No edit summary |
||
| (6 intermediate revisions by the same user not shown) | |||
| Line 1: | Line 1: | ||
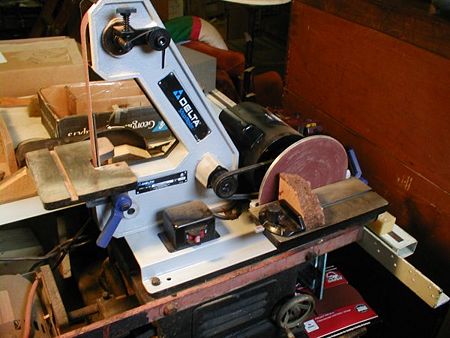
'''Many pipe makers use a combination Belt Disk sander, such as this Delta: ''' | |||
[[Image:disk_belt_sander.jpg|thumb|450px|left|]] | |||
It has 1" x 42" belt sander, in combination with an 8" disc sander on the side. This tool is common and inexpensive, and available in home improvement stores. Some pipe makers use this as their main shaping tool for the stummel, but most prefer a sanding disc chucked into their lathe or a motor and arbor dedicated to the task (some have several). While this combination tool has a sanding disc, it is not easily accessed for stummel shaping. Because of its proximity to the bench the tool is sitting on, one is very limited one the range of motion of the stummel when shaping on the disc. It also has a protective shield that interferes with using the disc for shaping. This shield can be removed though, which helps, but it's still far from ideal. | |||
The disc of this combination unit is very usefull for squaring the briar blocks before drilling them though. Depending on how your block is chucked into the lathe, having the side of the blocks square with one another can be critical to having the draught hole hit dead center in the bottom of the tobacco chamber. If the block is square, it allows a self-centering chucks to have the block perfectly centered regardless of which side of the block is chucked. With a square, you can set the table by the sanding disc exactly 90° to the face of the sanding disc, and adjust the guide to also be exactly at the 0 point. | |||
Most people use the belt when they use this tool for shaping. Some find it is helpful to remove the backing plate when doing so. The belt is very helpful for shaping hand cut stems--it can be used to remove most of the excess vulcanite, and also to roughly cut in the button. This is not a perfect tool, but it works, and is easily obtained at modest cost. | |||
'''Here are more professional approaches to using belt sanders for shaping:''' | |||
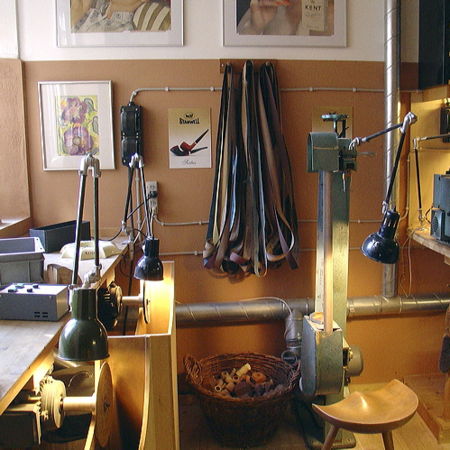
A shot from the shop of Tom Eltang , showing two dedicated disk sanders, and a commercial flexible belt sander: | |||
[[Image:eltang_sanders.jpg|thumb|center|450px| Sanders at Tom Eltang's shop]] | |||
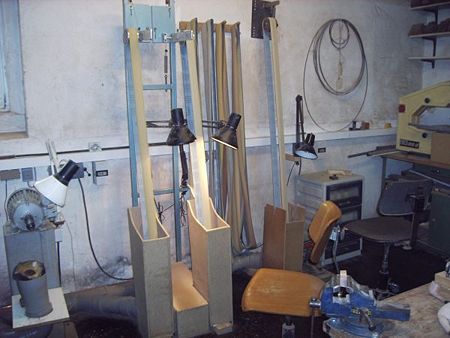
Bellow are shots from the shop of [[Rainer Barbi]]: | |||
[[Image:barbi_sanders.jpg|thumb|center|450px|Rainer's Sanders, courtesy of Heinz D (pipe makers forum]] | |||
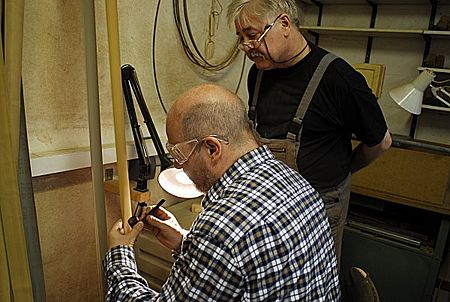
In the picture above, on the left you can see the motor for the disk sander, center is a belt sander with two separate belts, and on the right is a custom built belt sander. Many of the European pipe makers are using this type of machine: | |||
[[Image:barbi_beltsanders.jpg|thumb|center|450px|Rainer watching Heinz at the belt sander, courtesy of Heinz D (pipe makers forum]] | |||
This one should be simple enough to build by oneself, and the materials should be affordable. The longer the belt the more flexable it will be, and the easier to get into areas like the bowl/shank junktion. The idea is to lead the belt with the fingers, and thereby form it in any shape you need. It takes some time to learn the technique, but once learned this method is versatile and effective. | |||
My father in law will build me the needed frame with the possibility to bend the v-belt by changing the position of the motor. | |||
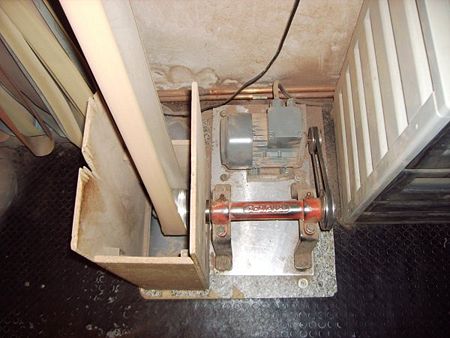
It is important that that one of the wheels the belt runs over should be out of metal or electroconductive material to prevent electrostatics. Here is the lower Pulley and drive motor: | |||
[[Image:barbi_custom_beltsander.jpg|thumb|center|450px|Rainer's Sander, courtesy of Heinz D (pipe makers forum]] | |||
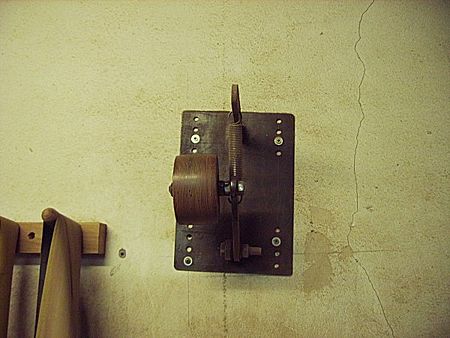
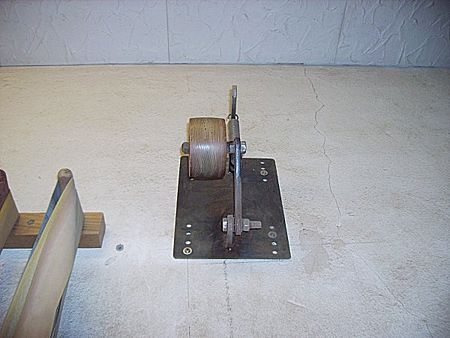
The motor should run between 800 to 1000 rpm or the belt speed will need to be adjusted via stepped pulleys. Higher speeds than this will tend to burn the fingers while guiding the belt. Because ther is no need of much torque, a 0.5 to 1 HP motor should suffice. Here is the upper pulley assembly: | |||
[[Image:barbi_custom_beltsander2.jpg|thumb|center|450px|Rainer's Sander, courtesy of Heinz D (pipe makers forum]] | |||
[[Image:barbi_custom_beltsander3.jpg|thumb|center|450px|Rainer's Sander, courtesy of Heinz D (pipe makers forum]] | |||
The machine can be used with different grit belts. A handy assortment would include 120, 180, 220, and 320 grit. | |||
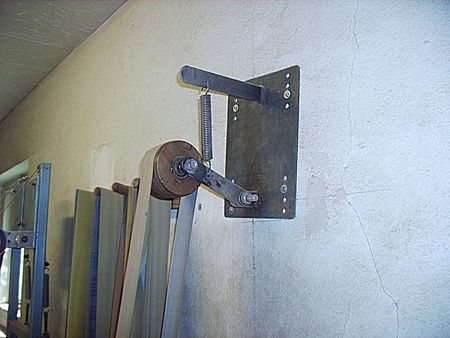
Here is the upper pulley assembly with a belt installed. | |||
[[Image:barbi_custom_beltsander4.jpg|thumb|center|450px|Rainer's Sander, courtesy of Heinz D (pipe makers forum]] | |||
For this type of application, where you want to be able to guide & bend the belt by hand, you need "J" weight (very flexible) belts. | |||
One source of belts is: [http://www.trugrit.com/ http://www.trugrit.com/] | |||
You might need to have them custom cut & joined for extra long ones as seen in the above pics, or you can also find places that sell the cloth backed in rolls to make your own. | |||
Generic belts are most often false economy here. Recommended makes include Klingspor, Norton, Hermes, or 3M. Buy your belts from a reputable supplier that sells the quality belts from these manufacturers. Even these makers offer low end alternatives that are not suitable for this application. | |||
Latest revision as of 01:02, 18 August 2007
Many pipe makers use a combination Belt Disk sander, such as this Delta:
It has 1" x 42" belt sander, in combination with an 8" disc sander on the side. This tool is common and inexpensive, and available in home improvement stores. Some pipe makers use this as their main shaping tool for the stummel, but most prefer a sanding disc chucked into their lathe or a motor and arbor dedicated to the task (some have several). While this combination tool has a sanding disc, it is not easily accessed for stummel shaping. Because of its proximity to the bench the tool is sitting on, one is very limited one the range of motion of the stummel when shaping on the disc. It also has a protective shield that interferes with using the disc for shaping. This shield can be removed though, which helps, but it's still far from ideal.
The disc of this combination unit is very usefull for squaring the briar blocks before drilling them though. Depending on how your block is chucked into the lathe, having the side of the blocks square with one another can be critical to having the draught hole hit dead center in the bottom of the tobacco chamber. If the block is square, it allows a self-centering chucks to have the block perfectly centered regardless of which side of the block is chucked. With a square, you can set the table by the sanding disc exactly 90° to the face of the sanding disc, and adjust the guide to also be exactly at the 0 point.
Most people use the belt when they use this tool for shaping. Some find it is helpful to remove the backing plate when doing so. The belt is very helpful for shaping hand cut stems--it can be used to remove most of the excess vulcanite, and also to roughly cut in the button. This is not a perfect tool, but it works, and is easily obtained at modest cost.
Here are more professional approaches to using belt sanders for shaping:
A shot from the shop of Tom Eltang , showing two dedicated disk sanders, and a commercial flexible belt sander:
Bellow are shots from the shop of Rainer Barbi:
In the picture above, on the left you can see the motor for the disk sander, center is a belt sander with two separate belts, and on the right is a custom built belt sander. Many of the European pipe makers are using this type of machine:
This one should be simple enough to build by oneself, and the materials should be affordable. The longer the belt the more flexable it will be, and the easier to get into areas like the bowl/shank junktion. The idea is to lead the belt with the fingers, and thereby form it in any shape you need. It takes some time to learn the technique, but once learned this method is versatile and effective.
My father in law will build me the needed frame with the possibility to bend the v-belt by changing the position of the motor.
It is important that that one of the wheels the belt runs over should be out of metal or electroconductive material to prevent electrostatics. Here is the lower Pulley and drive motor:
The motor should run between 800 to 1000 rpm or the belt speed will need to be adjusted via stepped pulleys. Higher speeds than this will tend to burn the fingers while guiding the belt. Because ther is no need of much torque, a 0.5 to 1 HP motor should suffice. Here is the upper pulley assembly:
The machine can be used with different grit belts. A handy assortment would include 120, 180, 220, and 320 grit. Here is the upper pulley assembly with a belt installed.
For this type of application, where you want to be able to guide & bend the belt by hand, you need "J" weight (very flexible) belts. One source of belts is: http://www.trugrit.com/ You might need to have them custom cut & joined for extra long ones as seen in the above pics, or you can also find places that sell the cloth backed in rolls to make your own.
Generic belts are most often false economy here. Recommended makes include Klingspor, Norton, Hermes, or 3M. Buy your belts from a reputable supplier that sells the quality belts from these manufacturers. Even these makers offer low end alternatives that are not suitable for this application.
