Trever Talbert on Drilling
From Creating, Briar, by Trever Talbert, from his website, and used by permission.
Drilling via the lathe
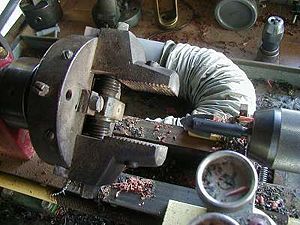
Here you see the lathe set up for bowl drilling. The lathe allows the bowl to be freehand turned as well as drilled. The 2-jaw chuck pictured is an extremely heavy design custom-made for pipemaking.
Now it's time to get set up to drill the bowl. Our new shop offers us a variety of options for pipe drilling. We have the lathe, which I have used in the majority of cases in the past. We have 3 drill presses, the workhorses. We also have 3 custom-made drilling machines with varying capabilities, which I'll describe below. For starters though, I will describe the lathe drilling. I reconfigure the lathe with the 2-jaw chuck on the headstock and the drillchuck on the tailstock. This is a bit more trouble to go to when I could simply drill it on a drill press, but I do it for several reasons. The lathe is much stabler for drilling, and drills a smoother hole. The spade bits work nicely in the lathe, whereas they tend to chatter and drill off-round in the drill press. Also, the tailstock drilling is very sensitive and I can feel a lot more through it than I can with the drill press. I can feel by touch when the bowl bit has reached the airhole, and can also feel if anything unexpected comes up, such as fissures in the wood or cracks.
It's important to get the block lined up properly with the drill. I start by sketching the depth and location of the bowl onto the pipe shape, and then mount the stummel in the lathe chuck using the flat lower sides that I left in the shaping stage. I drill the mortise first, then adjust the angle if needed and drill the airhole.
Once these holes are drilled, I rotate the pipe in place and line up the bowl angle with the airhole angle. Now that the block is mounted and aligned in the lathe, it's time to drill the bowl. I've already decided which drill/bowl shape to use back during the design, so I pop that bit into the chuck in the tailstock.
I run the lathe at minimum speed, which is 500 rpm for ours. Higher speeds can chatter and also tend to heat up too much, sometimes burning the wood. I advance the bit into the spinning block very slowly and back out often. I constantly blow off the accumulating shavings and make sure to allow time for cooling as heat builds up. Drilling is a process of advancing the drill by lever for about 3/4", then moving the entire tailstock forward and using the lever to advance the drill again. The further extended the bit and chuck get from the tailstock, the more vulnerable they are to being pulled off center by the hard wood, so I move in small increments. I watch the drill bit to gauge its depth, and stay alert to the feel of the drilling.
I can tell by touch when the bit has reached the bottom of the pilot hole and when it has broken through into the airhole. Once it's reached the airhole, I pull the entire tailstock off and blow out the interior of the bowl, then inspect the bowl with a flashlight. If there are any flaws or problems evident it gets chunked. I check the distance to the bottom of the airhole and replace the drill bit and go that little bit further, to get the bowl bottom even.
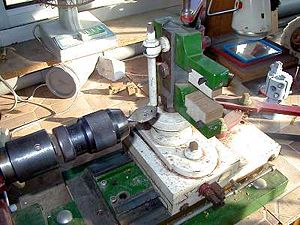
The machine above is from St. Claude, France, and was designed for pipemaking. This is another option we have for our drilling. This machine works by clamping the block between self-centering jaws mounted vertically, and sliding the entire clamp forward onto the spinning drill which is mounted in a heavy-duty steel shaft driven by an overhead belt-drive motor. The clamp can be raised and lowered. It can also be slid from side to side and rotated in place by a 30 degree axis, allowing a bowl and airhole to be drilled without loosening the block in the clamp. The chuck jaws are designed to accept customized wooden blocks. These blocks, softer than the briar or stem, can grip tightly and safely and can be replaced easily. They are very customizable by their nature and can be drilled and cut to create specialized chuck jaws for gripping unusually-shaped stems or machined stummels. The machine can also be mounted with various fraizing cutters which can be used either on briar or stems - the stem or stummel is clamped and slid forward onto the spinning blades, which cut the piece into a pre-set shape. With stems, small diamond-tipped cutters will turn a tenon to pre-set sizes while the stem is gripped in the customized wooden clamp jaws.
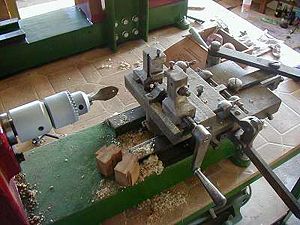
A third drilling option - We have two larger drilling machines which utilize horizontally mounted clamps rather than vertical. As with the previous machine, the block or stem is affixed in the self-centering jaws and the entire clamp assembly slides forward onto the spinning drill. The jaws can rotate in place without being loosened, making it easier to keep the airhole and bowl drilling in line. Two of the custom wooden clamp jaws can be seen on the frame bed - they are designed to grip round stems or stock.


